
February 2018
ADD IMAGES TO THE TECH APP
Item images are now in the Tech App! Images uploaded on items on either the Bid Worksheet or on the Job Processing tab will now show on the Tech App on the Materials tab.
NEW YIELD REPORT
The production report has been updated to include two new columns. The report will now display the estimated yield and the actual yield for comparison. This update will only affect foam items. The estimated yield will come from the board feet per set yield that is set on the item's record. The actual yield is calculated based on the actual number of sets used in relationship with the estimated board footage. These calculations assume that the board feet figured by the estimator is the same board footage that was installed.
Administrators can use these numbers to better manage the estimating yield to display more accurate amounts to take to the job site from work orders.
To update the estimating yields for an item, go to the item's main page by finding the item from the Search Items page. If your actual yield is constantly less than your estimated yield then this could be an issue with your product, your equipment, or not taking into account the weather conditions in your estimating yields.
As an administrator, you can update your yields and/or default prices and costs to account for an actual yield not meeting expectations.
RESTRICT JOBPRO BY OFFICE
Overview
JobPro will be enhanced with the ability to restrict all office associated information throughout the system by office and user. Administrators will have the ability to associate resources to one or many offices configured in their JobPro system. By default, all resources will have access to all offices to reflect how the system currently operates. Removing an office from a resource will restrict all information associated to that office from being visible.
Salespeople
The available salesperson list will also be automatically filtered based on the offices the user has access to and the salespeople available in those offices. On these add pages, the office and salesperson selection dropdown will be limited to the offices the user is associated to. The add bid page will also take into account which templates should be available based on the office selected and the template associated to that office. On the pages themselves, the office and salesperson selection field will also be limited to the offices the user is associated to. This is for when a user would like to change what office the entity in question is in, they would only have the ability to select offices they are associated to. If the user needs to change the office to one they are not associated to then an administrator with access to all offices would need to make that update. The resources available to schedule and items available to add to the job page will be automatically filtered based on the office selected for the job.
Items
The item page will be update like the resources page so that items can be restricted by office or shared across multiple offices. If an item should only be available in one office then that item would only be associated to the one office. An item will have the ability to be associate to one or shared in multiple offices. The item select field on the bid worksheet, template, and quick job entry page will be automatically filtered based on the office the bid is set to and whether or not that item is associated to that office.
Customers & Templates
The customer and template page will also be updated like the resources and item page so that customers and templates can be restricted to one office or shared across multiple offices.
Entry Header Dropdown Menu
The Entry dropdown will have the following modifications. The time entry daily and weekly resource and job list will be automatically filtered based on the offices the user is associated to. The Scheduler will only display resources and job associated to the user and the search jobs section will automatically be filter as well. The purchase order entry page will also be filtered by office the jobs are associated to by the offices the user is associated to.
Settings
The entities in the settings dropdown are organizational settings so no office filters will exist on these pages. These pages should be hidden from non-admin personnel.
Quickbooks Integration
The integrations to other accounting software’s will be automatically filtered by the offices the user is associated to.
What if a user gains access to a page where they should not have access?
If the user gains access to a page they should not have access to, such as being forwarded a link to a job in an office they are not associated to, JobPro will not load the page when the user navigates to the URL.
Search Pages to be Modified
The following search pages will be modified to only display the offices the user is associated to and thus automatically filtering the results to those offices: Customers, Contacts, Datasheets, Bids, Templates, Items, Jobs, Invoices, Payments, Properties, Resources, Equipment, Purchase Orders, and Suppliers.
Reports and Widgets
All reports and widgets will be automatically filtered in the dropdown select filter for office and the results based on the offices the user is associated to. The following is the list of the reports that will be updated: Time Summary Report, Employee Assignments, Master Sales Report, Monthly Sales Report, Projected Job Profit Report, Job Profit Report, Appt. Calendar, Inventory Used, Sales Cycle Report, Sets Usage Report, Installed Material Report, Projected Material Report, Production Report, Resource Variance Report, Labor Report, Commissions Report, Report Builder, Summary Reports, Energy Savings Report, Inspection Sheet Report, Job Total vs Invoice Total, and Payroll Report. The following is the list of dashboard widgets that will be updated: Accounts Receivable Aging, Accounts Receivable Dashboard, Activity Overview, Alerts, Bid and Job Status Counts, Bid Totals By Sales Person Pie Chart, Bids – Quick Listing, Bids by Sales Person, Counts by Status Pie Chart, Datasheets/Bids/Jobs/Work Order – By Status, Equipment Calendar, Equipment Dashboard, Estimated vs Actual Labor comparison, GL Sales Report, Gross Profit, Job Calendar, Job Closing Rate, Job Listing, Job Recommendations, Job Stage Report, Job Tracker, Open Payment Report, Payment Method Report, Sales by Product Line Chart, Sales Person Rankings, Sales Person Weekly Rankings Line Chart, Sales Person Weekly Totals Line Charts, Sales Pipeline, Salesperson Month to Date Totals, Sales Person Week to Date Totals, User Store, Weekly Item Pricing Averages, WIP Report.
SHORTCUT TO INVOICE 100% OF JOB
A new shortcut button has been added to the “Create New Invoice” popup to make it easier to immediately invoice for 100% of the job. Next to the section to input the amount of the items to be invoiced, there is now a “100%” button that will prefill this percentage section with 100% of the total amount for the job. Users can still enter in their own percentage of the job to invoice in this section.

MOVE CREATE JOB BUTTON TO BREADCRUMB HEADER
Prior to this release, the best way to turn a bid into a job was to go to the Bid Information tab and click the “Create Job” button. With this month’s enhancements, JobPro is putting an additional “Create Job” button towards the top of the page in the same box that holds the breadcrumbs related to the bid. Regardless of which bid tab you are on, a user will always have the new “Create Job” button available to them.
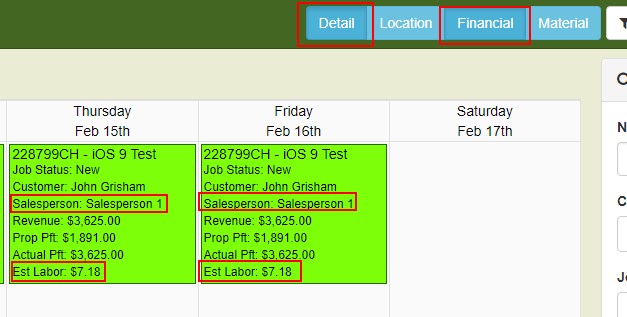
SALESPERSON AND ESTIMATED LABOR INFORMATION ADDED TO SCHEDULER DISPLAY
Two new items have been added to the information that can be displayed on JobPro’s Scheduler: Salesperson (now included in Detail section) and Estimated Labor (now included in Financial section).
To have the Salesperson display for the job on JobPro’s Scheduler, please make sure the Detail section is selected. To have the Estimated Labor display for the job on JobPro’s Scheduler, please make sure the Financial section is selected.
TECH APP CHECK-IN/CHECK-OUT FEATURE TO DEFAULT FIRST TIME RATE TYPE
JobPro is making it easier than ever to use the Check-in/Check-out feature on the Tech App.
JobPro will make the top rate type in your display order for your Time Rate Types the default selection for your time type within the Check-in/Check-out feature. In other words, if you want your “Regular” time rate to always default in for the Check-in/Check-out feature for your installers, then you would put the “Regular” time rate at the top of your Time Rate Types display order.
But how does a user get to Time Rate Types within JobPro to choose the default? Under the Settings header, for those users with the permission, there will be a dropdown selection of “Configure Time Rate Types”. Clicking this selection will take you to the Time Rate Types page (screen shot below). From this page, a user can add new Time Rate Types and change the display order of the Time Rate Types (remember, this is what will determine the Time Rate Type that defaults in for your installers on the Tech App).
If your user does not have the “Configure Time Rate Types” selection underneath the Settings header, please have a manager/administrator contact our Support Team to have this turned on for your user.
NEW “TOTAL” LINE ON PAYROLL REPORT SUMMARY PDF
To keep consistent with our formatting, the Payroll Report, Summary PDF is being enhanced to show column totals on the print out. Totals are already being calculated through the U.I. (User Interface) and on the Detail PDF.
COMPANY LOGO ON CUSTOMER STATEMENTS BY OFFICE
JobPro is enhancing the system in regards to the Customer Statement PDF. The Customer Statement can be generated in the system by going to the customer page, then the Invoices/Payments tab, and then clicking the “Customer Statement” button in the top, left-hand corner of the tab.
In the past, the Customer Statement has only ever pulled the main logo of your organization. But what if you have more than one office in your organization and you have different logos for both? JobPro has you covered.
JobPro will pull the logo from the office notated on the customer and place it on the customer’s Customer Statement (just like we do for invoices) so that you have the correct logo for any item being sent to the customer.
This setting will be based off the office that is notated on the Main tab of the customer page.